Friday, January 25, 2019

Quick and Easy Birthday Cards

Happy New Year!

The Sisters In Stamping asked me to join them this week in creating quick and easy birthday cards.  I was happy to join in.  I can always use birthday cards!

I always start with DSP when I make quick and easy cards.  It takes the guess work out of figuring out which colors to use.  And, I don't like a lot of white space; just not my style.

So, I broke out my new Happiness Blooms DSP.  It's so cute, right?!?!  I chose four designs from the pack and cut them down.  I then mounted those pieces on cardstock card bases. 

Next, I grabbed the Happy Birthday Gorgeous stamps.  I used the Happy Birthday sentiment and stamped on Whisper White using Night of Navy ink.  I punched out the stamped sentiment using the Pretty Label Punch.  I then used the same punch and punched on Night of Navy cardstock.

I decided I wanted balloons on my cards.  So, I used my Balloon Bouquet Punch and punched out balloons from Call Me Clover, Lovely Lipstick, Pineapple Punch, and Calypso Coral cardstock.

Once everything was punched, I then assembled each card.  I layered the punched sentiment piece on the Night of Navy pieces in different ways.  Once I adhered everything down, I added some bows made from 1/8" Grosgrain Ribbon and 3/8" Satin Ribbon in the matching colors.  I glued those down and finished the cards by placing some Happiness Blooms Enamel Dots along the punched sentiment.

These cards took me very little time - quick and easy :) 


Thanks for looking and have a great weekend.

Check out the quick and easy cards that Debbie and Jennifer made here!

Friday, December 14, 2018

Crafty Christmas Ornaments

This week, Karla asked us to make a Christmas ornament.  I thought on this a long time.  This wasn't an easy theme for me this week!  But, I did what I know and do best - I alter things!  I started out with a bangle jewelry box.  I covered it with a piece of Merry Merlot cardstock.  I then ran a couple pieces of Copper Foil Sheets and the Blizzard Thinlits Die through the Big Shot.  I carefully extracted the snowflake pieces and set them aside.  I cut the die cut sheet into the size of the box and adhered it over the Merry Merlot.  After that was done, I adhered a piece of the Merry Merlot and Copper ribbon to the outside of the box.  I also used a few other pieces to make the hanging piece and bow.

I took the punched out snowflakes and layered them.  I had small copper brads, so used them to hold the pieces together.  I then randomly placed them on the front of the box,  using dimensionals.  You can't tell, but I sometimes used 2 or 3 dimensionals, stacked on top of each other, to give the snowflakes different heights.


It's a bit much, but it's done!  I can't wait to see how it looks on my tree this year :)  Thanks for looking and please check out the other SISer's ornaments here!

Have a wonderful day and a wonderful holiday season!


Friday, December 7, 2018

Non-ink pad coloring

I wanted to see what kinds of coloring projects the Sisters In Stamping could come up with and challenged them to create something using coloring tools other than ink pads.  They can use markers, watercolor pencils, blender pens, aqua painters, etc.

I love to color, so I love images that I can stamp in black then and color.

I bought the SU! watercolor pencils a while ago, but just haven't had a chance to use them.  I did use them for this project!

Here is the card I made:


I stamped the images and sentiment from the Making Christmas Bright and Signs of Santa sets.  I did color in the images with my pencils, but did not use an aqua painter or blender pen after coloring.  It was a lot of lights to color, but I think this is a fun and happy card because of all of the color :)

Please check out the other ladies' creations here.

Thanks for looking and have a great day!

Friday, November 30, 2018

Quick and Easy Christmas Cards

This week's theme is to make a quick and easy Christmas card.  I don't think I know how to make anything quick and easy.  I tend to make a mountain out of a mole hill!  LOL

But, with DSP, it does make things quicker and easier.  When you use DSP, you already know your colors.  So, I pull the cardstock, ink pads, and ribbons that match and get started!

I started off with the Joyous Noel Specialty DSP.  I love copper in crafting and this paper is so beautiful!  I also used the new Copper Foil Sheets.

I stamped sentiment images from the Traditions Punch Box set and punched them out.  I also used the Pretty Label Punch and Circle Punches.  I then adhered the stamped images, tied ribbon on the card, and before I knew it, I had 10 cards!  Here is a sample of the cards I made.


The ribbons I used were Merlot Copper Ribbon and Vanilla Copper Ribbon.  Oh, I also used the Braided Linen Trim.

Head on over to the Sisters In Stamping blog to see their quick and easy Christmas cards.

Thanks for looking and have a great day!

Friday, November 23, 2018

Set of Christmas Tags

This week, Jennifer asked us to make a set of gift tags.  Since Christmas is right around the corner, I wanted to make a set of Christmas tags.

I'm loving the Festive Farmhouse DSP and matching Twine!  It's very country, warm, and makes me happy!

I didn't want to use the same sentiment on each tag and wanted to use my Christmas Traditions Punch Box stamps and punch.  So, I took the ink colors from the DSP (Cherry Cobbler and Mellow Moss) and stamped on both Whisper White and Very Vanilla cardstock (both are in the DSP).  After I stamped the sentiments, I took cardstock in Cherry Cobbler and Mellow Moss and ran different sizes of the Stitched Shaped Thinlit dies through the Big Shot.  I also punched out 1 1/2" circles of both colors.

Then, I started assembling!  After I layered and adhered the pieces, I used the twine to finish them up.  It was fun and I made a lot!

Here they are:


Hop on over to the SIS blog here to see the other sets of gift tags!

Thanks for looking and have a great day!

Friday, November 16, 2018

A Simple Sympathy Card

Sadly, I've entered that age in my life where I started needing Sympathy cards.  So, it's nice to have some made when the need arises.  I've noticed that all of my Sympathy cards are generally for women.  So, when Debbie picked this week's theme to make a Sympathy card, I decided to try to make one a little more masculine.  It was hard not to use ribbon and other girly embellishments, but I did it!

Here is my card:


I kept it very simple by using the Tranquil Textures DSP.  It's got a lot of great masculine colors.  I ran one of the sheets through the Big Shot using the Detailed Dragonfly die.  I stamped the sentiment from the Flourishing Phrases set.  I also used the Banner Triple Punch.

Not much else to say on this one.  Please check out the other Sympathy cards made by the Sisters In Stamping here.

Thanks for looking and have a great day!

Friday, November 9, 2018

First Stampin' Up! Stamp Set

Wow, I can't believe I bought my very first Stampin' Up! stamp set in 2000.  How have 18 years gone by already????  I remember buying this stamp set from a coworker who was having a party and knew I was a scrapbooker.  She brought in the catalog and explained that all you needed was some stamps, ink, and paper to create any scrapbook page needed.   Little did I know I'd still be stamping with SU! 18 years later!

I saw this set and because I have pet bunnies, I had to have it!  So, it was the very first set I bought.  Now 18 years later, I still have it and won't ever part with it!  It's just too cute and I love it so much!


stampin-039-up-2000-FUNNY-BUNNY-set-of-7-Very-Good-Condition


I should have taken a picture of the set, but borrowed the image from Bowlmeli, who is selling it on EBay.  


So, this is the card I made.  I decided to keep it very simple, since the style is very different.  I stamped the images on Whisper White and colored them in, using my SU! markers - mainly the Brights Markers.  I then tied a piece of Bermuda Bay ribbon and adhered it down on a Bermuda Bay card base.  The final touch was to use some pearly white puffy paint on the tail.  Simple and easy!
 
I can't wait to see the other Sisters In Stamping first sets!  Check them out here.

Thanks for looking and have a great day!


Friday, November 2, 2018

There's something about ribbon...

I love ribbon whether it is on a package, a card, or hair accessory!  There is something beautiful, fun, and creative about it.  It can dress up something, make it more whimsical, or make it more elegant.  Ribbon is definitely my favorite embellishment when it comes to paper crafting.

So, when asked for a theme for the Sisters In Stamping, I chose ribbon!

I thought on this for a long time, having the basic idea in my head.  I wanted to use different colors of ribbon behind a die cut image.  I thought I'd do one large one, but then, I stumbled on my new Holiday goodies and while looking at the new In Colors, I knew what I'd do!

This is the card I created:


It's not a great photo, so sorry about that!

But, I love how this turned out.  I first took a piece of Whisper White cardstock and randomly punched out the light bulbs with the new punch.  Then, I put down some double sticky tape around the punched out bulbs - on the back of the cardfront.  I began laying down small pieces of the In Color ribbons to "color" each bulb.  I used the gold edged ribbon for the bulb bases.  I then used some Tombow glue to create the wire line.  I squeezed it out in a random path and let it air dry so it would be tacky.  I then layed down the silver bakers twin over it.  The bulbs needed just a little bit more, so I made bows out the same In Color ribbons and adhered them to each bulb. 

I stamped the sentiment from the Making Christmas Bright stamp set (matches the Bulb Builder Punch).  I used my trimmer to cut it out and then framed it on In Color pieces.  You can't tell, but the base of the card is a piece of Call Me Clover.  The In Colors this year are perfect for Christmas!  I think this card turned out exactly how I wanted and it's fun, right?

Hope your upcoming holidays are bright and filled with fun.  Thanks for looking and hop on over to the SIS blog to see what the other ladies created using ribbon!

Friday, October 26, 2018

Shake, shake, shake...

Who doesn't love a shaker card?  I have always loved them!  But, they are kind of a pain to make!  LOL!

This week, we made shaker cards.  I first made one, but then realized it just didn't work.  So, I had to start all over again!  But, I loved how this one turned out, if I do say so myself ;)

This is the Christmas shaker card I made:


I used the Festive Farmhouse DSP to start.  Then, I used the Coffee Cafe Thinlits to die cut the coffee cup, sleeve, and lid.  On the sleeve, I used the oval thinlit to cut out the window.  I placed a small piece of Window Sheet and glued it in place.  Then, I used the Foam adhesive strips to hold in the little beads.

The sentiment is from the Cookie Cutter Christmas set.  I punched it and some matching Mellow Moss cardstock using the Pretty Label Punch.  I then tied some bows using the Cherry Cobbler Twine and glued them all down.

I think this will be a fun Christmas card to give to a coffee lover!

Let's head over to the Sisters In Stamping blog to see their shaker cards!  Follow me here...

Thanks for looking and have a wonderful day and weekend!

Friday, October 19, 2018

Holiday Catty CASE

Happy Friday!  Today, we are CASEing something from the SU! Holiday Catalog.  There were so many choices, but I finally settled on the little Santa bags featured on pag 18.

This is what I made using the adorable little Santa's Bags.


I stamped the Candy Canes, "For You",  and Tag items using the Candy Cane Season Stamps and Signs of Santa Stamps. I used the Candy Cane punch as well.  To make the tag, I stamped the Ho!Ho!Ho! all on a piece of Very Vanilla, lining up the Hos!  Then, I just used my Trimmer to cut the tag into a size I thought that would work.  I stamped the items in Garden Green and Poppy Parade.  Although the colors are a little different, I used the Festive Farmhouse Twine to attach the tag to the bag.

Below is the one from the catalog that I CASEd.  Check out the other CASEs here.  Thanks for looking and have a great day!
Stampin' Up! Holiday Catalog - Page 18


Friday, October 12, 2018

A Halloween Treat

Who doesn't love the treats at Halloween?  I'm a sucker for Halloween candy!  I tried not to buy candy early this year, but having to wait 15 minutes at Target Pharmacy did me in - LOL! 

This week, we are making Halloween treats!  This is the little treat box I made! 


I was finally able to use my Petite Treat Framelit.  I made the little treat box using Gorgeous Grape and Granny Apple Green cardstock.  I then stamped the sentiment (from the Itty Bitty Greetings set) on Pumpkin Pie cardstock.  I punched it and a piece of Basic Black cardstock using the Duet Banner Punch. 

I made my little mummy using the Cookie Cutter Builder Punch.  I punched out a couple pieces of Whisper White.  I glued them together.  Then, I took some gauze from my medicine kit and started wrapping my mummy.  I added some googly eyes, and my mummy came alive!

I used double sticky red tape to attach my mummy to the treat box and then adhered the banner sentiment over top of the mummy using some glue.

It's a spooky cute treat, right?

Hop on over to the Sisters In Stamping blog to see what other treats were made!

Thanks for looking and have a great weekend!

Friday, October 5, 2018

Go ahead and embellish...

...a card, that is!  Don't embellish the truth ;)

This week, Karla asked us to use our favorite embellishment on our project.  This was really hard for me because I LOVE embellishments almost as much as I love designer papers!  OH, and I love, love, love ribbon!  OK, I seriously love embellishments!

But, I am a sucker for anything that can self stick!  This year, SU! has some metallic (gold and silver) pearl embellishments and I really do love them.  I think I used almost all of the silver ones on my card!  LOL!


I first ran a piece of black cardstock through the new Tufted Dynamic embossing folder.  I then adhered it to a Gorgeous Grape base.  I wanted to use my new Darling Label set/punch, so I chose the birthday stamp, inked it up in Gorgeous Grape, stamped it, punched it out, adhered it to the card, and tied a piece of Gorgeous Grape striped mini ribbon around the top.  Then, I got busy placing the silver metallic pearls in the diamond intersections.  It was a little tedious, but I think well worth it. 

Let's see what the other ladies embellished their cards with!  Check it out!

Thanks for looking and have a great weekend!

Friday, September 28, 2018

Thank A Friend

This week, the theme is one I chose.  I've been wanting to do this for a long time - thank my friends.  I think about them often, but am always doing something, so don't take the time to email, call, or text that I'm thinking of them and appreciate them.  So, this was a good way for me to really think about my friends and send them cards to say, "Thank you for being an awesome you!"

This is the card I made.  I made 12 of them and sent them out. 


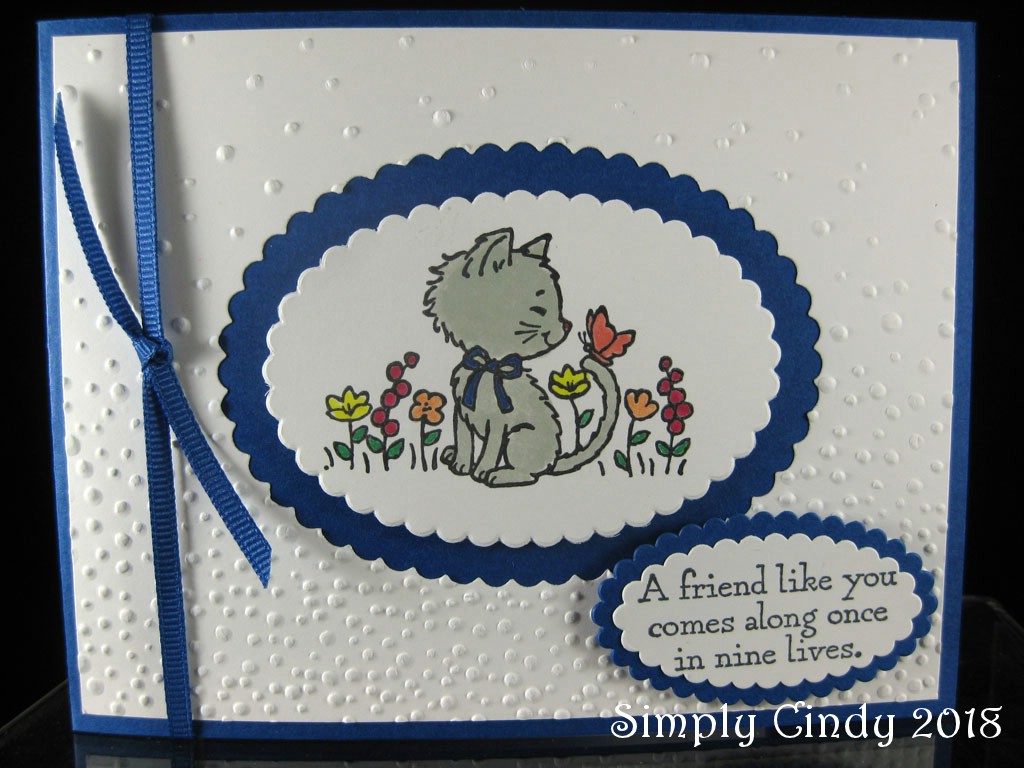
I love this adorable Pretty Kitty and the saying was purrfect ;)

I first decided on this image and the sentiment, stamped using Memento Black, then die cut them using the ovals thinlets.  I took a piece of white cardstock and ran it through the Softly Falling embossing folder and then used a bigger oval thinlet to diet cut our the middle.  I colored in the image using the SU! markers.  I used this year's In Colors along with Calypso Coral for the butterfly and Basic Gray for Pretty Kitty.  I decided to use Blueberry Bushell as the base color and added the matching ribbon at the end. 

To all of you who are great friends, either to me or someone else, thank you!

Check out the cards the other Sisters In Stamping created here.

Thank you for looking and have a wonderful weekend!

Friday, September 21, 2018

A little punch art

This week, Rachel challenged us to create a project using punches.  This is always a tough one for me.  I can't see past the actual shapes of the punches to create something new!  But, I was able to come up with this card:

I created this little Kokeshi doll using the Vases Builder Punch.  I created the background using the Artfully Folded stamp set.  I placed several of the images on a large block and then inked and stamped randomly.  I used a piece of DSP from the Tropical Escape pack and that's where I drew the color from - Blushing Bride. 

I love punches, but clearly I'm not a punch artist!  LOL :)

Please check out the other punch creations at the SIS blog here.

Thanks for looking and have a great day/weekend!

Friday, September 14, 2018

Layout Challenge Accepted!

This week, Jennifer challenged us to create a card using this layout she created:


I wasn't sure what I'd do for it, but grabbed my Tropical Escape DSP stack, the matching Tropical Chic set and thinlits, and got to work!  I love all of the tropical series!  The layout Jennifer created is wonderful because you can use DSP, stamps, embellishments, etc - so many shapes and sizes! 

The sentiment is from the Happy Day Gorgeous set.  I cut out the smallest hibiscus flower/leaf towards the upper right.  For the flowers near the sentiment, I stamped using Blushing Bride ink and die cut the flowers.  I popped them up using dimensionals.

If I were a washi tape person, that would work really well with this design!  But, I'm not, so I used my beloved DSP ;)

Anyway, thanks for looking and please check out what the other ladies created at the Sisters In Stamping blog here.

Have a wonderful and safe weekend!

Friday, September 7, 2018

Love my DSP!

Anyone who knows me knows how much I love DSP.  I am obsessed with it!  If I could only have one accessory to go with my stamps and ink, it would be DSP for sure!  There is just so much you can do with it.  This week, we are to feature a creation using DSP.  Since I have so many birthday cards to make, this was really easy for me!  I decided to use the Specialty DSP called Broadway Bound.  This is some fun and shiny paper!  I made two cards, actually:


I used two different papers from the DSP package.  I decided to use a piece of Gold Foil Sheet to mat each DSP piece and Basic Black as the card base for both.   Before I adhered the DSP pieces to the Gold Foil Sheets, I ran the them through the big shot to die cut the word WISH from the Broadway Birthday Bundle.  After cutting out the word, I adhered the DSP to the Gold Foil and the Gold Foil to the card base.  I then adhered the word Wish to each.  On the card with the numbers, I also ran a piece of Basic Black through the Big Shot to die cut the word.  I off-set the gold word so you could see it better over the gold numbers.  I then tied some black ribbon at the top of each and stamped the "Make A" sentiment, but it out, and adhered it right under the ribbon.  I wanted to use my new candle embellishments, so I adhered one to the the top of each card.


These were really easy and fun to make and I think will be a great card for any age or gender! 

Thanks for looking.  Check out the other DSP projects on the Sisters In Stamping blog here.

Have a great day!

Friday, August 31, 2018

Color Combo Challenge!

TGIF Everyone!!!!  Karla challenged us to a color combo challenge this week:  Bermuda Bay, Lemon Lime Twist & Whisper White

Holy moly was this a challenge for me!  I think I tried three different projects and finally settled on this:


I really tried to make the three colors the only colors, but it just wasn't working for me.  So, I ended up adding some Powder Pink and Berry Burst.

I used the Beautiful Bouquet stamp set.  I die cut an oval and cut one end to use as the vase.  I also used a piece of Bermuda Bay striped ribbon.  

I don't love this card, but I did try!

Hope you all have a wonderful Labor Day and weekend!  Please visit the Sisters In Stamping Blog to see how the other ladies used the colors on their projects.

Friday, August 24, 2018

Glimmer and Shine!

What girl doesn't like a little glimmer and shine?  This week's challenge was to create something with glimmer paper or glitter - just make it shine!

I chose to use my Sparkle Glimmer Paper.  I love this paper.  It's just so beautiful!  I also chose to use the Serene Garden bundle.  I loved this set as soon as I saw it and I have been so happy to have gotten it!

I first chose a piece of DSP from the Tranquil Textures paper package for the background.  I then stamped the corner images using Tranquil Teal.  I stamped the flower and bird images on the Glimmer Paper using Black Memento.  I then broke out my SU! In Color markers and started coloring.  I say coloring, but I was very gentle in placing the marker on the glimmer paper.  I kind of dotted the paper.  I used pretty much all of the colors from this year and last year's In Colors!  Once I finished coloring the paper, I die cut the images.  I popped up the bird using dimensionals, but glued down the flower pieces.  I don't think you can see it, but I also used Wink of Stella to color in the leaves.  The picture doesn't really show of the glimmer and shine on this card.  It's really pretty in person and I can't wait to make more.


Thanks for looking and have a great day!

Check out the other glimmer and shine projects on the Sisters In Stamping blog here.

Friday, August 17, 2018

Emboss Away!

Rachel chose "wet embossing" as the theme this week for the Sisters In Stamping.  I used to emboss a lot!  I recently started doing it again and really do love the way it looks.  I also love to do it for images I'm coloring.  It makes it so much easier to color and stay within the lines!

I really wasn't sure what stamps to use on this, but knew I wanted to use my Coffee Cafe stamps and matching framelits.  So I grabbed them and this is what I created:


I used a piece of Crumb Cake cardstock and then stamped the coffee beans in Early Espresso.  I inked up the stamps and then stamped off twice on the cardstock to have different shades of beans.  I like the way it looks.  I then stamped the "Thanks A Latte" using Early Espresso, poured clear embossing powder over, and heated it to emboss/set.  I thought it might look cool to then have the cup sleeve be embossed, so I used Versamark all over the piece of cardstock I just stamped and embossed.  I poured more embossing powder on and heated it.  I decided to use Craft white ink on Whisper White cardstock, clear embossing powder, and heated that up.  I used Versamark ink on Hunter Green cardstock, embossing powder, and heated that up.  Once I finished embossing everything, I let it all cool and then ran all of the pieces through the Big Shot with the framelits.  After die cutting, I assembled the card.

I'm not sure you can see all of the embossing I've done on this card, but in person, it does stand out.  I know people are probably wondering why a straw is sticking out of a hot cup, but I started using a straw to drink my hot coffees a long time ago when a coworker friend did it.  I like my coffee hot and you can drink it quickly and before it cools this way :)  Plus, I think it is better to bypass the teeth when drinking coffee to help keep from getting as stained. 

Anyway, thanks for looking and have a wonderful weekend!  Check out the other ladies' creations here.

Friday, August 10, 2018

Back To School

TGIF!  All of the stores are packed with everyone getting ready to go back to school.  Jennifer picked the perfect theme for today's Sisters In Stamping projects:  Back To School!

My nieces and nephew are all getting ready.  So, to let them know I'm thinking of them, I decided to make each a card with their school's initials and colors on the outside.

I used some markers and my ruler to create a piece of lined notebook paper.  I first used the Granite Gray marker to make the horizontal lines.  I liked that one for my nephew's card.  But, I liked the Pool Party maker lines for the girls' cards.  I used the Real Red marker to make the vertical lines.  I addressed each one (I blacked out in the pictures) and wrote a little sentence of encouragement using my Basic Black marker.  I think they came out pretty cute.  I put a Starbuck's gift card in each.  :)

Here are the individual cards.  GMU (Hunter Green and Crushed Curry), UK (Blueberry Bushel and Whisper White), and BHS (Merry Merlot and Crushed Curry).  I used the Large Letter Framelits to die cut the letters.


Wishing all the back-to-schoolers (teachers and students) a wonderful school year!

Thanks for looking and check out what back to school projects the Sisters In Stamping made here.